In League of Legends: Wild Rift, it is essential to understand how Runes work. Equipping your Champions with Runes can make them more powerful and more formidable in battle. Players can customize their use of Runes before the start of the game, during the champion select phase, to boost their performance.
Different sets of Runes work better with certain playstyles, so choosing the correct one will be a game-changer and will help determine who gets the upper hand in battle.
What are Runes in Wild Rift?
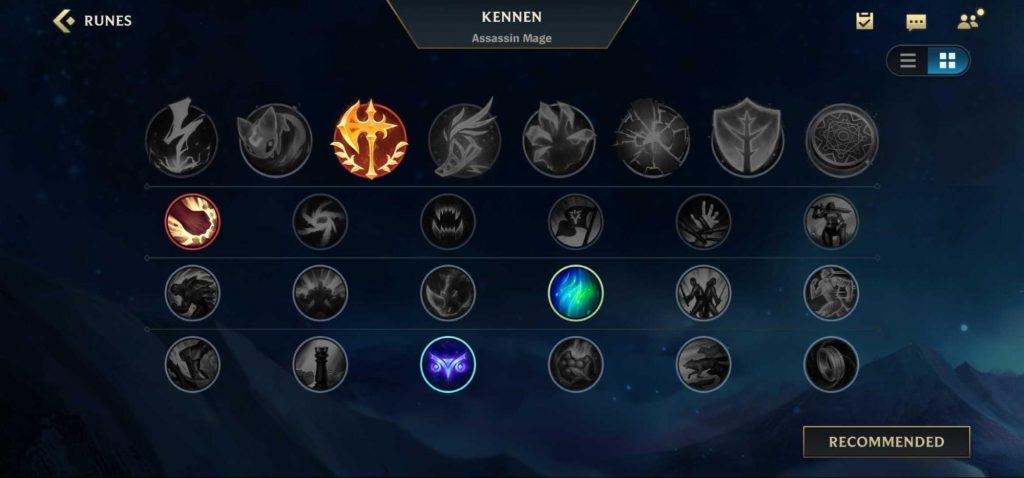
Runes are used to strengthen the abilities of a Champion. They give stat-enhancing effects and are chosen right before a match begins. Players can opt to select the available presets or manage them depending on enemy team composition and what suits their playstyle.
Keystone: This is the main rune used in Wild Rift. Keystone Runes feature defensive or offensive effects that impact a player’s gameplay. It is therefore vital to choose the correct Keystone Rune for your Champion. Players can select 1 from the 8 runes to arm the champion they use.
Minor: Minor Runes are offensive in nature. Players can select 3 of these runes to boost their champion’s strengths or enhance their existing strength.
Wild Rift Runes List
There are 26 Runes that can be used in Wild Rift. A complete rune page is comprised of 4 runes types, namely: Keystone (Main), Domination (Damage/Offensive bonus), Resolve (Health, Resistance, Regen, etc.), and Inspiration (Utility stats like man, bonus gold, etc.).
Keystone Runes |
|
 Electrocute |
Passive: Basic attacks and abilities generate stacks on enemy champions hit, up to one per attack or cast. Applying 3 stacks to a target within a 3 second period causes them to be struck by lightning, dealing them 30 − 184 (based on level) (+ 40% bonus AD) (+ 25% AP) Attack damage.pngAbility power.png Adaptive damage.
Adaptive Damage: Deals either physical or magic damage depending on your bonus statistics, defaulting based on the origin of the effect.
Summoner level: 4 |
 Aery |
Passive: Basic attacks and abilities against an enemy champion signals Aery to dash to them, dealing 10 − 60 (based on level) (+ 20% bonus AD) (+ 10% AP) Attack damage.pngAbility power.png Adaptive damage. Heal power icon.png Healing, shielding, or buffing an ally signals Aery to dash to them, Hybrid resistances icon.png shielding them for 20 − 120 (based on level) (+ 40% bonus AD) (+ 20% AP) for 2 seconds.
Aery lingers on the target for 2 seconds before flying back to the user, and cannot be sent out again until she returns. Aery is initially very slow, but gradually accelerates, and can be picked up by moving near her. Adaptive Damage: Deals either physical or magic damage depending on your bonus statistics, defaulting based on the origin of the effect.
|
 Conqueror |
Passive: Basic attacks and abilities generate stacks of Conqueror on enemy champions hit, up to one per attack or cast. Each stack of Conqueror lasts 8 seconds and grants 2 − 6 (based on level) bonus Attack Damage or 4 − 12 (based on level) Ability Power (Adaptive), stacking up to 5 times, for a maximum of 10 − 30 (based on level) bonus Attack Damage or 20 − 60 (based on level) Ability Power (Adaptive).
When fully stacked, deal 10% bonus Adaptive damage to champions.
|
 Fleet of Footwork |
Unique – Energized: Moving and basic attacking generate Energize stacks, up to 100.
When fully Energized, your next basic attack heals you for 15 – 85 (based on level) (+ 30% bonus AD) (+ 30% AP) and grants 20% bonus movement speed for 1 second. Summoner level: 6 |
 Grasp of the Undying |
Passive: Entering combat generates one stack every second for the next 3 seconds. Additional stacks may be generated by re-entering combat after 2 seconds. After reaching 4 stacks, your next basic attack within 6 seconds against an enemy champion consumes all stacks to deal 4% of your maximum health in bonus magic damage, restore 2% of your maximum health, and permanently grant 5 bonus health. The empowered attack duration refreshes whenever going in combat.
On ranged champions, all effects are reduced by 60%. Summoner level: 8 |
 Aftershock |
Passive: Immobilizing an enemy champion grants a static 50 (+ 50% bonus armor) bonus armor and 50 (+ 50% bonus magic resistance) bonus magic resistance for 2.5 seconds.
After the duration, you release a shockwave that deals 12 – 110 (based on level) (+ 4% of your maximum health) magic damage to nearby enemies. Cooldown: 35s Summoner level: 8 |
 Font of Life |
Passive: Slowing or immobilizing an enemy champion marks them for 4 seconds.
Allied champions who basic attack marked enemies heal for 3% of your maximum health over 2 seconds. Summoner level: 10 |
 Kleptomancy |
Passive: After using an ability, your next ability hit or basic attack against an enemy champion will grant you a random item effect.
Cooldown: 25s Summoner level: 10 |
Secondary Runes ( Row 1 – Domination) |
|
 Brutal |
Passive: Gain 7 Attack Damage and 2% armor penetration, or 14 Ability Power and 2% magic penetration. (Adaptive)
Summoner level: 4 |

Gathering Storm |
Passive: Every 2 min, gain 2 Attack Damage or 4 Ability Power. (Adaptive)
Summoner level: 4 |
 Hunter – Vampirism |
Passive: Gain 2% Physical Vamp or 2% Magical Vamp (Adaptive). Unique champion takedowns grant 2 bonus Attack Damage with 1% Physical Vamp or 4 Ability Power with 1% Magical Vamp up to 7% Physical Vamp and 10 bonus Attack Damage or 7% Magical Wamp and 20 Ability Power at 5 stacks (Adaptive). |
 Triumph |
Passive: Champion takedowns restore 10% missing health. Deal 3% increased damage to enemies below 35% health.
Summoner level: 8 |
 Weakness |
Passive: Slowing or Immobilizing an enemy champion marks them for 5 seconds, while marked they take 5% increased damage.
Summoner level: 10 |
 Champion |
Passive: Gain 10% increased damage against champions. Lose 5% each time you die until the bonus disappears.
Summoner level: 10 |
Secondary Runes (Row 2 – Resolve) |
|
 Backbone |
Passive: Gain 10 bonus armor or 10 bonus magic resistance, based on whichever stat you have less of.
Summoner level: 4 |

Conditioning |
Passive: Gain 8 bonus armor and 8 bonus magic resistance after 5 minutes of game time.
Summoner level: 4 |
 Hunter – Titan |
Passive: Gain 20 maximum health. Unique champion takedowns grant an additional 20 maximum health and 4% tenacity up to 120 maximum health and 20% tenacity at 5 stacks.
Summoner level: 6 |
 Regeneration |
Passive: Every 3 seconds, regenerates 2% missing health or 2% missing mana, based on whichever percentage is lower.
Summoner level: 8 |

Loyalty |
Passive: Gain 2 bonus armor and 5 bonus magic resistance. Your closest ally champion gains 5 bonus armor and 2 bonus magic resistance, which can be stacked.
Summoner level: 10 |
 Spirit Walker |
Passive: Gain 50 maximum health and 20% slow resistance.
Summoner level: 10 |
Secondary Runes (Row 3 – Inspiration) |
|
 Pathfinder |
Passive: When out-of-combat, gain 8% bonus movement speed in brush, jungle, and river.
Summoner level: 4 |

Mastermind |
Passive: Deal 10% bonus true damage to Epic Monsters and Turrets. Earn an extra 100 gold and 500XP upon taking or assisting in taking epic monsters and turrets objectives.
Summoner level: 4 |
 Hunter – Genius |
Passive: Gain 2.5 ability haste. Unique champion takedowns grant 2.5 ability haste up to 15 at 5 stacks.
Summoner level: 6 |
 Sweet Tooth |
Passive: Increases Honeyfruit healing by 25%, Each fruit eaten also provides 20 gold.
Summoner level: 8 |

Pack Hunter |
Passive: While near ally champions, gain 2% bonus movement speed. For each unique ally you participate in a takedown with, you gain 50 gold and the ally gains 50 gold.
Summoner level: 10 |
 Manaflow Band |
Passive: Hitting an enemy champion with an ability or empowered attack permanently increases your maximum mana by 30, up to 300 mana.
Summoner level: 10 |
Common Wild Rift Runes Setup
While Wild Rift’s in-game recommended runes are specifically accurate for every champion, adjusting runes based on the enemy team line updiscussed, it is necessary for players to set and adjust their primary and secondary runes to fit the champion they are using. This will be vital when battle commences. Refer to the following list to help with the most suitable rune setup for each role.
For Attack Damage Carry (ADC) Champions:
Primary Rune: Fleet Footwork, Kleptomancy or Conqueror
Secondary Runes:
(Row 1 – Domination) – Brutal, Gathering Storm, or Triumph
(Row 2 – Resolve) – Regeneration
Row 3 – Inspiration) – Manaflow Band, Hunter-Genius.
For Tank Support Champions:
Primary Rune: Font of Life or Aftershock
Secondary Runes:
(Row 1 – Domination) – Triumph or Weakness
(Row 2 – Resolve) – Any option works well
Row 3 – Inspiration) – Pack Hunter or Hunter-Genius
For Ability Power (AP) Support Champions:
Primary Rune: Font of Life
Secondary Runes:
(Row 1 – Domination) – Triumph or Weakness
(Row 2 – Resolve) – Any option works well
Row 3 – Inspiration) – Hunter-Genius or Manaflow Band
For Ability Power (AP) Mid-Lane Champions:
Primary Rune: Domination, Aery or Kleptomancy
Secondary Runes:
(Row 1 – Domination) – Weakness, Triumph or Brutal
(Row 2 – Resolve) – Regeneration
Row 3 – Inspiration) – Hunter-Genius or Manaflow Band
For Attack Damage (AD) Mid-Lane Champions:
Primary Rune: Fleet Footwork or Conqueror
Secondary Runes:
(Row 1 – Domination) – Brutal or Triumph
(Row 2 – Resolve) – Regeneration
Row 3 – Inspiration) – Hunter-Genius
For Pure Tank Baron Lane Champions:
Primary Rune: Aftershock, Font of Life or Grasp of the Undying
Secondary Runes:
(Row 1 – Domination) – Triumph or Weakness
(Row 2 – Resolve) – Conditioning
Row 3 – Inspiration) – Pack Hunter or Hunter-Genius
For Bruiser Baron Lane Champions:
Primary Rune: Conqueror or Grasp of the Undying
Secondary Runes:
(Row 1 – Domination) – Gathering Storm or Triumph
(Row 2 – Resolve) – Regeneration
Row 3 – Inspiration) – Pathfinder or Hunter-Genius
For Ability Power (AP) Jungle Champions:
Primary Rune: Domination
Secondary Runes:
(Row 1 – Domination) – Triumph or Brutal
(Row 2 – Resolve) – Regeneration
(Row 3 – Inspiration) – Pathfinder, Sweet Tooth, or Mastermind
For Attack Damage (AD) Jungle Champions:
Primary Rune: Aftershock or Conqueror
Secondary Runes:
(Row 1 – Domination) – Triumph or Brutal
(Row 2 – Resolve) – Regeneration
(Row 3 – Inspiration) – Pathfinder, Sweet Tooth, or Mastermind
Win games using the right runes
Generally, there are numerous rune combinations that you can use. Take time out to research each rune’s effects and how it enhances your champion’s abilities. Also, make sure to set up your runes in advance for your favorite champions. Going the extra mile to learn about your enemy matchup on your lane will help you create the most effective counter for their champion.
Don’t forget to top up Wild Cores only at Codashop. We guarantee faster and more convenient top-ups so you can enjoy a hassle-free gaming experience.


 Collide in Honkai Star Rail 3.4 Fate/Stay Night Collab Event")


 Collide in Honkai Star Rail 3.4 Fate/Stay Night Collab Event")


