Elemental reactions are a key feature of Genshin Impact that distinguishes it from other Action RPGs. Each character in the game is associated with one of the seven elements, and utilizing their elemental abilities can greatly increase your team’s damage output. While it is important to consider elemental diversity when assembling a team, it is also crucial to consider the synergy between characters’ abilities beyond just their elements.
Understanding Genshin Impact elemental reactions is one of the key components to success in the game, but it is not the only factor. Players must also have a solid understanding of mechanics such as dodging and blocking, as well as well-built characters with strong equipment and artifacts, to conquer the game’s most difficult content.
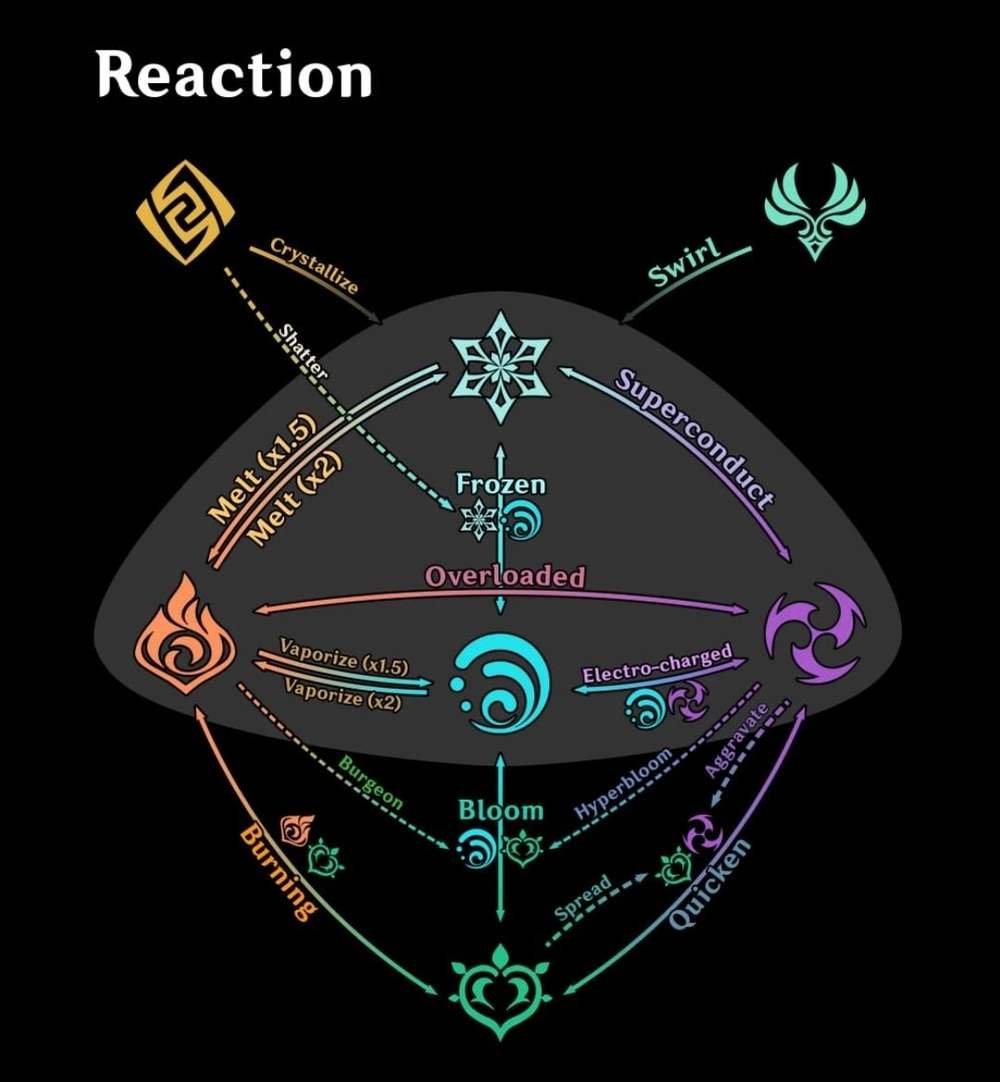
*Image credit to https://www.hoyolab.com/article/13658532
Elemental Reactions
Transformative
Transformational Responses are quite different. These frequently accomplish something substantially different than merely doubling the total damage from a strike. Transformational responses are also not influenced by Talent levels, CRIT, DMG% bonuses, ATK, or other conventional damage components but are amplified by opponent resistances when transformative reactions inflict damage.
They are solely dependent on the Trigger’s Elemental Mastery and Level. As a result, any character specializing in Transformational Reactions should be leveled to 90 and have Elemental Mastery as near to 1,000 as feasible while still meeting Energy Recharge criteria. Furthermore, these reactions are distinct from other types of attacks in terms of damage.
Transformative reactions include the following:
Bloom
This reaction results in the formation of a Dendro Core on the ground. After a few seconds, it will detonate on its own, inflicting Dendro damage to everyone caught in the blast in an area-of-effect (you take a tiny percent of it). It happens when Dendro interacts with Hydro.
Burgeon
If you use Pyro on the Bloom Cores that you previously set up, Burgeon will happen. The Dendro Core made from Bloom bursts, inflicting Dendro damage in an area of effect on everyone caught in the blast (you take a tiny percent of it).
Burning
This reaction happens when the elements Pyro and Dendro interact. Whether you’re dealing Pyro damage to a Dendro-inflected enemy or to the grassy fields, Burning affects everything (even your character) that steps on it. If you’re affected by Burning, you’ll receive two units of Pyro and experience four instances of Pyro damage per second. You would need to reapply Dendro to keep the reaction going.
Crystallize
This reaction happens when any element interacts with Geo. It creates a crystal on the ground that may be picked up and used to construct a small shield that prevents harm until it breaks or decays naturally. The shield’s durability and length are determined by the level and Elemental Mastery, providing greater protection against the element with which Geo responded.
Electro-Charged
This reaction enables both Hydro and Electro to exist on an enemy for as long as they are Electro-Charged. The longer Electro-Charged is kept up, the more damage it causes over time. However, this reaction is notoriously challenging to control.
Frozen
The Frozen reaction immobilizes an opponent for the duration determined by the Trigger’s Elemental Mastery and level. It is also possible for both Hydro and Cryo auras to exist on the same enemy. Although it doesn’t deal extra damage, it will give players more than enough time to shred the frozen enemies’ HP.
Hyperbloom
This reaction happens when the element Electro interacts with a Bloom Core. Instead of exploding like Burgeon, it becomes a homing missile instead that flies toward a single target to deal Dendro damage.
Overload
This reaction causes an explosion that does Pyro damage to opponents in an area of effect, occasionally propelling mobs caught in the blast radius. This reaction happens when Pyro and Electro elements react.
Shattered
This reaction happens when any blunt attacks from the Geo element, claymore, bombs, and more land on a Frozen enemy. It will deal extra damage but would also remove the Frozen effect on the enemies.
Superconduct
This reaction happens when Cryo and Electro interact. It generates a tiny explosion that harms enemies in a small area of effect. In 12 seconds, those impacted by Superconduct have their Physical resistance reduced by 40%. This is ideal for a character like Eula, who concentrates on physical damage rather than elemental damage.
Swirl
This reaction occurs when Anemo interacts with any other element except Geo. It spreads the secondary element to nearby enemies in an area of effect. Swirls are enhanced by 60% damage and have their resistance reduced by 40% for a specified period when carrying the 4pc Viridescent Venerer artifact set.
Amplifying
Amplifying Reactions are the simplest to comprehend. They simply add a multiplier to the overall damage while also accounting for the Elemental Mastery of one of the characters involved. In short, they amplify the damage you were already doing. Amplifying Reactions also benefit from DMG% and CRIT stats on your Trigger character.
These reactions include the following:
Vaporize
This reaction happens when Hydro interacts with Pyro, multiplying damage by 2. This reaction consumes fewer elemental gauge units, which allows for more reactions.
Reverse-Vape
This reaction occurs when Pyro is applied to Hydro, multiplying damage by 1.5.
Melt
This reaction happens when Pyro interacts with Cryo, where damage is multiplied by 2.
Reverse-Melt
When Cryo and Pyro interact, Reverse-Melt happens. Like Reverse-Vape, this reaction consumes fewer elemental gauge units.
Although Forward reactions are better since they trigger a higher damage multiplier, Reverse reactions are actually more viable. These reactions allow for more instances, which naturally results in more damage.
Catalyze
After 3.0 was launched, we were finally allowed to explore Sumeru and the Catalyze reactions. This limited group of reactions merits its own category since it impacts damage differently than both Transformational and Amplifying Reactions.
Quicken
Quicken is the first response to happen, with Dendro interacting with Electro or vice versa. When this happens, the adversary obtains a Quicken aura. By using Electro or Dendro against a Quickened enemy, you will receive an additive bonus, or Flat Damage Bonus, in addition to the attack’s usual damage.
Aggravate
Aggravate occurs when Electro is applied to a Quickened enemy. The additional damage would be 1.15x the character’s Level Multiplier.
Spread
If you use Dendro on a Quickened enemy, a Spread reaction will happen. This deals an additional damage of 1.25x the character’s Level Multiplier.
Use caution when combining Catalyze with other reactions. When other elements are applied to Quickened opponents, the duration of the Quicken Aura is reduced. As a result, it’s ideal to build your whole team around this reaction while also integrating an Anemo character to render your opponents vulnerable to Electro damage.
Top 10 Best Elemental Reactions
Since we have established that elemental reactions are important when playing Genshin Impact, it’s only natural that we rank them! Which ones are the best for dealing extra damage? Which elemental reaction is the easiest to apply?
- Catalyze
- Hyperbloom
- Melt
- Vaporize
- Frozen
- Bloom
- Swirl
- Electro-Charged
- Overload
- Superconduct
It’s not a surprise that Catalyze reactions take the top spot due to its uniqueness and its three different stages. The amount of extra damage dealt by Spread or Aggravate on Quickened enemies is a nice addition.
Meanwhile, Superconduct ranks 10 since it’s very niche. The majority of the time, the game expects you to do elemental damage with various reactions. Relying only on physical damage severely limits the player, and there aren’t many excellent physical DPS troops, to begin with.
If you truly want to build a superconduct team, there are sets like the Bloodstained Chivalry set and the Pale Flame set that both directly enhance your physical damage.
Artifacts Recommendation
Viridescent Venerer
When it comes to the most destructive debuff in the game, the Viridescent Venerer is unrivaled. It’s designed for Anemo support characters because the four-piece bonus reduces foes’ elemental resistance to the matching element contained in the Swirl effect by 40%.
This is a significant boost in damage for any character that relies on Elemental Reactions, such as Diluc, Mona, Childe, Hu Tao, or anybody else who employs Cryo, Pyro, or Hydro elements. But, in order for it to be functional, you must have an Anemo support, which is always accessible in the shape of the Traveler.
Noblesse Oblige
Noblesse Oblige is ideal for players who want to deal as much elemental damage as possible. It places a strong emphasis on Elemental Burst, with its two-piece bonus providing the character with a 20% increase in Burst damage.
Where it truly shines is in its four-piece bonus, which grants the whole party a 20% attack boost for 12 seconds every time the user uses an Elemental Burst. This effect does not stack, but the entire set is still worth collecting because it is a five-star item collection with far greater stats than other Artifacts.
Crimson Witch of Flames
This artifact is best for Pyro characters such as Diluc, Hu Tao, and Klee. The two-piece bonus boosts Pyro damage, but the four-piece bonus transforms any pyro user with a quick enough Elemental Skill into a walking firestorm. The four-piece bonus also deals an increased Overloaded and Burning damage of 40%.
Blizzard Strayer
The Blizzard Strayer set was designed for Cryo characters, as seen by the two-piece bonus. The four-piece bonus is incredible, granting up to 40% greater Crit Rate if the foes are impacted by Cryo or are Frozen. This set is perfect for characters like Ganyu and Kamisato Ayaka.
Heart of Depth
Most Hydro DPS characters will need this artifact set, except for Xingqui who benefits from artifacts that boost his Elemental Burst instead. At two-piece, the Heart of Depth deals a Hydro DMG Bonus of 15%, while its four-piece set gives the character a 30% boost in Normal and Charged Attack DMG for 15s.
Which elemental reaction is your go-to, and which are you interested in building next? Let us know in the comments below!
Don’t forget to top up your Genshin Impact Genesis Crystals through Codashop today. We have plenty of safe and convenient top-up methods so you can focus on seamless gameplay.


 Collide in Honkai Star Rail 3.4 Fate/Stay Night Collab Event")


 Collide in Honkai Star Rail 3.4 Fate/Stay Night Collab Event")


